This series follows my journey as I knit my very first sweater. Previously, I talked about choosing a design, choosing yarn, and knitting the back and the fronts.
In case you can’t tell, I haven’t been a knitter for very long. In fact, at the start of this year, I knew absolutely nothing about this amazing craft. So taking a moment to reflect on all that I’ve learned so far, my progress has been nothing short of amazing. I’ve gone from struggling with my first cast-on to being halfway through my first sweater.
There’s always something to learn – a new increase, a new decrease. A provisional cast-on so that you can knit in two directions. Seaming and blocking. Every skill feels like an entirely new direction, filled with endless possibilities for projects and designs. But for now, let’s return to Sweater Quest. So far, we have the left and right fronts, and the back. I’m not a particular fan of sweater vests, so next I’ll need to make some sleeves!
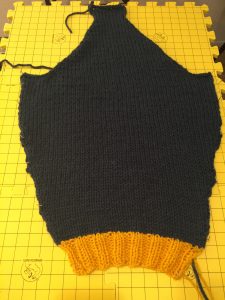
The sleeves are raglan-style, meaning that in addition to the arms, they form most of the shoulder of the cardigan. The design calls for a yellow accent at the cuff, so stitches for the wrist circumference are cast-on. After three inches of 2×2 ribbing, I changed to the main (indigo) color, placing increases at either side of the fabric as I widened it over 10 rows. From there, after binding off stitches from each side for the raglan edge, I slowly decreased stitches on both sides all the way to the top of the sleeve. Done correctly, the raglan edge of each sleeve should match up perfectly with the corresponding edge on the left/right fronts and the back.
Above is a picture of the sleeve, pinned to the edges of my blocking board. The two sleeves are the final parts of the sweater, which means it’s time for blocking and seaming.